Manual for MIDI Piccolo 2F1D
1. Regular mode
Connection
Connect a MIDI cable from the MIDI OUT output in the controller to a MIDI IN input in a controlled device. Connect included power supply adapter to the supply socket in the controller.
If you have a MIDI cable with phantom power supply attached on pins 6 and 7, you can connect this cable to the MIDI OUT connector in the controller. Connect the DIN5 connector to the MIDI IN input on the opposite side (controlled device) and connect the supply adapter to th supply tail.
Controlling programs
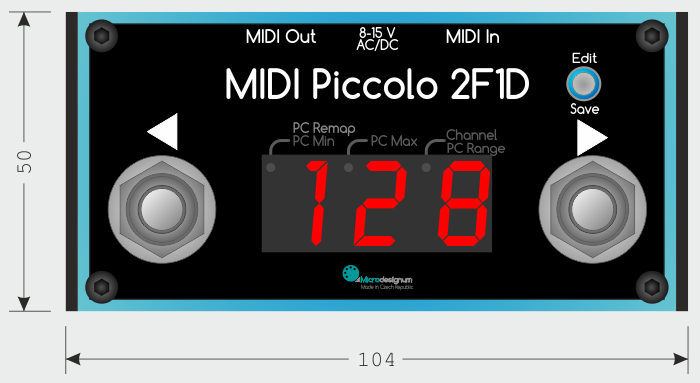
By pressing the footswitches ◂Program or Program▸ is decreased/iuncreased the number on the display. Which number you can see on the display, such Program Change number is sent to MIDI output, if you didn't use the programs remapping function.
Programs remapping
Each program number can be remapped on another Program Change number. This is useful especially if you do not want or can not remap the presets of your multieffect.
Select on the display the program number that you want to remap, for example 2. Hold longly the Edit/Save button. EDI is shown on the display. When the button is released, the dot lights near PC Remap inscription and the Program Change number blinks. The default number is always the same as the program number, thus also 2. Using the footswitches ◂Program and Program▸ set the number of Program Change, for example 10. Then hold longly the Edit/Save button. Then SAV is shown on the display and when the button is released, the program number 2 is shown on the display again (not the remapped Program Change number 10).
Backlight
The MIDI controller has the top panel backlighted. If you want to switch off the backlight, press simultaneously the footswitches ◂Program and Program▸. The backlight is turned off and this option is stored to permanent memory. If you want to turn it on, do the same.
2. Global Settings
Turn off the controller, hold down the button Edit/Save and turn on the controller. The display shows: GLB and when the button is released, you can edit individual global parameters. By pressing the Edit/Save button, you will be able to edit another parameter.
You can edit these parameters in sequence:
Channel number
The display shows C 1 (default 1. channel). Using the footswitches ◂Program and Program▸ select the MIDI channel (1 to 16) on which the controller will send the MIDI messages. Select the same channel on which your controlled device (multieffect) receives.
Then shortly press the Edit/Save button, this will bring you to the next parameter.
Beginning of the range
The dot with inscription PC Min lights on the display and number 1 blinks (default range is from 1). Using the footswitches ◂Program and Program▸ select the minimal program number that the controller will use (1 to 127).
Then shortly press the Edit/Save button, this will bring you to the next parameter.
End of the range
The dot with inscription PC Max lights on the display and number 128 blinks (a full range up to 128 is default). Using the footswitches ◂Program and Program▸ select the maximal program range, that the controller will use (2 to 128). For example, if you use only programs 1 - 10, select number 10.
When you will hold the Program▸ footswitch in regular mode then, the controller will gradually send an increasing program number and simultaneously it will show it on the display up to the selected maximal number, so for example to 10.
Then shortly press the Edit/Save button, this will bring you to the next parameter.
Program number format
Tne MIDI command Program Change is usually displayed in user format in range from 1 to 128. But some devices or programs use the values in technical format in range from 0 to 127. Depending on how your controlled device works (amplifier, multieffect etc.), you can change the displayed format.
The dot with inscription PC Range lights on the display and the number 128 blinks, which means that Program Change values are displayed in the user format in range from 1 to 128. Using the footswitches ◂Program and Program▸ select the technical, or user format of displaying the program number. When the technical format is selected, the display shows 127.
If you want to go to the beginning of the global menu, press shortly the Edit/Save button, this will bring you to the first parameter again.
You can save the parameters at any position in the global menu and get into regular mode. Press longly the Edit/Save button. The display shows SAV and the global parameters are stored into the permanent memory. When the button is released, the controller is in the regular mode.